Deploying large language models (LLMs) to production presents unique challenges: GPU resource management, model loading times, variable inference demands, and cost optimization. Traditional deployment approaches often struggle with the complexity of GPU orchestration and the dynamic scaling requirements of AI workloads.
In this comprehensive guide, we'll show you how to deploy a production-ready LLM serving API using Convox, complete with GPU auto-scaling, intelligent caching, and zero-downtime deployments. By the end, you'll have a fully functional LLM API that can handle everything from casual queries to high-volume inference workloads while automatically optimizing GPU resource usage and costs.
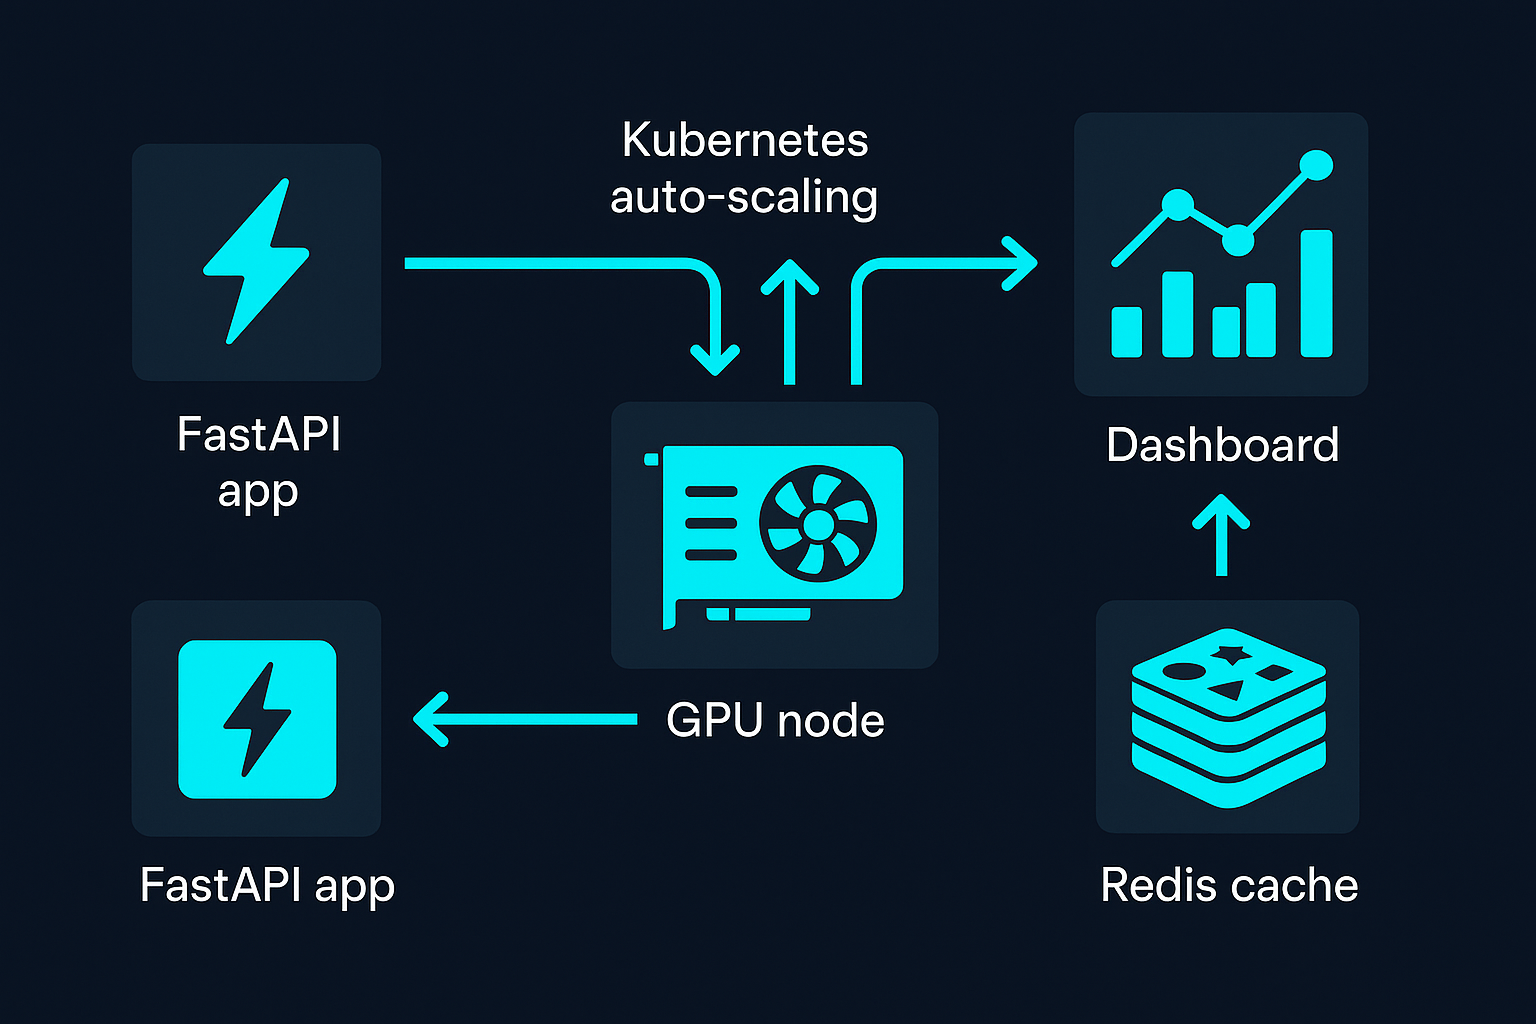
We'll create a real-time text generation API using:
No existing model required! This guide uses Microsoft's free DialoGPT model, which will be automatically downloaded during deployment. The final system will automatically scale GPU resources based on demand and can handle everything from a few queries per day to thousands of concurrent inference requests.
Before we begin, you'll need:
This guide uses Microsoft DialoGPT-medium, a free conversational AI model that:
Want to use a different model? Simply change the MODEL_NAME environment variable to any compatible Hugging Face model:
microsoft/DialoGPT-large (larger, more capable)facebook/blenderbot-400M-distill (Facebook's conversational AI)EleutherAI/gpt-neo-125M (GPT-style text generation)
ai-productionus-east-1 (or your preferred region with GPU availability)node_type=t3.medium (smaller standard nodes for non-GPU workloads)build_node_type=c5.xlarge (larger CPU-optimized for Docker builds)Once your rack is installed, you'll need to configure dedicated GPU node groups and enable the NVIDIA device plugin. This ensures GPU workloads are isolated from standard services and have the necessary GPU drivers available.
Create a JSON file named gpu-nodes.json with the following configuration:
[
  {
    "id": 101,
    "type": "g4dn.xlarge",
    "capacity_type": "ON_DEMAND",
    "min_size": 0,
    "max_size": 5,
    "label": "gpu-inference",
    "dedicated": true,
    "tags": "workload=llm-inference,environment=production,cost-center=ai"
  },
  {
    "id": 102,
    "type": "g4dn.2xlarge",
    "capacity_type": "SPOT",
    "min_size": 0,
    "max_size": 3,
    "label": "gpu-inference-large",
    "dedicated": true,
    "tags": "workload=llm-inference-large,environment=production,cost-center=ai"
  }
]
This configuration creates:
g4dn.xlarge) for regular inference workloadsg4dn.2xlarge) for high-performance inference using cost-effective spot instancesNow apply both the NVIDIA device plugin and GPU node groups in a single command:
convox rack params set nvidia_device_plugin_enable=true additional_node_groups_config=./gpu-nodes.json -r ai-productionThis command:
dedicated: true flag preventing non-GPU workloads from scheduling on expensive GPU nodesWhile your rack configures the GPU infrastructure, let's build our LLM application.
You can either clone our complete example repository or create the files manually.
git clone https://github.com/convox-examples/llm-gpu-api.git
cd llm-gpu-api
This repository contains all the files you need, plus additional examples and documentation.
If you prefer to build from scratch:
mkdir llm-api
cd llm-apiIf you cloned the repository, you already have all these files. If you're building manually, create app.py:
import os
import json
import time
import logging
import hashlib
from typing import Optional
import torch
import redis
from transformers import (
    AutoTokenizer,
    AutoModelForCausalLM,
    BitsAndBytesConfig,
    pipeline
)
from fastapi import FastAPI, HTTPException, BackgroundTasks
from fastapi.responses import JSONResponse
from pydantic import BaseModel, Field
import uvicorn

# Configure logging
logging.basicConfig(level=logging.INFO)
logger = logging.getLogger(__name__)

app = FastAPI(
    title="LLM API",
    version="1.0.0",
    description="Production-ready Large Language Model API with GPU acceleration"
)

class GenerationRequest(BaseModel):
    prompt: str = Field(..., min_length=1, max_length=2000)
    max_new_tokens: int = Field(default=100, ge=1, le=500)
    temperature: float = Field(default=0.7, ge=0.1, le=2.0)
    top_p: float = Field(default=0.9, ge=0.1, le=1.0)
    do_sample: bool = Field(default=True)
    stream: bool = Field(default=False)

class GenerationResponse(BaseModel):
    prompt: str
    generated_text: str
    processing_time: float
    device_used: str
    cached: bool
    tokens_generated: int

# Initialize Redis
redis_client = None
try:
    redis_url = os.getenv('CACHE_URL')
    if redis_url:
        redis_client = redis.from_url(redis_url, decode_responses=True)
        redis_client.ping()
        logger.info("Redis cache connected")
except Exception as e:
    logger.warning(f"Redis not available: {e}")

MODEL_NAME = os.getenv('MODEL_NAME', 'microsoft/DialoGPT-medium')
DEVICE = "cuda" if torch.cuda.is_available() else "cpu"
MAX_MEMORY_GB = int(os.getenv('MAX_MEMORY_GB', '12'))

tokenizer = None
model = None
text_generator = None

def initialize_model():
    """Initialize and load the LLM model"""
    global tokenizer, model, text_generator

    logger.info(f"Initializing model {MODEL_NAME} on {DEVICE}")

    if torch.cuda.is_available():
        gpu_name = torch.cuda.get_device_name(0)
        gpu_memory = torch.cuda.get_device_properties(0).total_memory / 1024**3
        logger.info(f"GPU: {gpu_name}, Memory: {gpu_memory:.1f}GB")

    try:
        tokenizer = AutoTokenizer.from_pretrained(
            MODEL_NAME,
            padding_side='left',
            cache_dir='/tmp/.transformers'
        )

        if tokenizer.pad_token is None:
            tokenizer.pad_token = tokenizer.eos_token

        model_kwargs = {
            "cache_dir": '/tmp/.transformers',
            "torch_dtype": torch.float16 if DEVICE == "cuda" else torch.float32,
        }

        if DEVICE == "cuda":
            model_kwargs["quantization_config"] = BitsAndBytesConfig(
                load_in_8bit=True,
                llm_int8_enable_fp32_cpu_offload=True
            )

        model = AutoModelForCausalLM.from_pretrained(
            MODEL_NAME,
            **model_kwargs
        )

        # Do NOT pass device= when using Accelerate or quantized models
        text_generator = pipeline(
            "text-generation",
            model=model,
            tokenizer=tokenizer,
            torch_dtype=torch.float16 if DEVICE == "cuda" else torch.float32
        )

        logger.info("Model initialized successfully")

    except Exception as e:
        logger.error(f"Model initialization failed: {e}")
        raise

def get_cache_key(prompt: str, params: dict) -> str:
    cache_data = f"{prompt}:{json.dumps(params, sort_keys=True)}"
    return f"llm:{hashlib.md5(cache_data.encode()).hexdigest()}"

def cache_response(key: str, response: dict, ttl: int = 3600):
    if redis_client:
        try:
            redis_client.setex(key, ttl, json.dumps(response))
        except Exception as e:
            logger.warning(f"Cache write failed: {e}")

def get_cached_response(key: str) -> Optional[dict]:
    if redis_client:
        try:
            cached = redis_client.get(key)
            if cached:
                return json.loads(cached)
        except Exception as e:
            logger.warning(f"Cache read failed: {e}")
    return None

@app.on_event("startup")
async def startup_event():
    initialize_model()

@app.get("/health")
async def health_check():
    health = {
        "status": "healthy",
        "model": MODEL_NAME,
        "device": DEVICE,
        "gpu_available": torch.cuda.is_available(),
        "model_loaded": model is not None,
        "cache_available": redis_client is not None
    }

    if torch.cuda.is_available():
        health.update({
            "gpu_name": torch.cuda.get_device_name(0),
            "gpu_memory_allocated": f"{torch.cuda.memory_allocated(0) / 1024**3:.2f}GB",
            "gpu_memory_reserved": f"{torch.cuda.memory_reserved(0) / 1024**3:.2f}GB"
        })

    return health

@app.get("/")
async def root():
    return {
        "message": "LLM API",
        "version": "1.0.0",
        "model": MODEL_NAME,
        "device": DEVICE,
        "endpoints": {
            "generate": "/generate",
            "health": "/health",
            "metrics": "/metrics"
        }
    }

@app.get("/metrics")
async def metrics():
    data = {
        "model": MODEL_NAME,
        "device": DEVICE,
        "requests_cached": 0
    }

    if torch.cuda.is_available():
        data.update({
            "gpu_memory_used": f"{torch.cuda.memory_allocated(0) / 1024**3:.2f}GB",
            "gpu_temperature": "N/A"
        })

    return data

@app.post("/generate", response_model=GenerationResponse)
async def generate_text(request: GenerationRequest, background_tasks: BackgroundTasks):
    start = time.time()

    if model is None or tokenizer is None:
        raise HTTPException(status_code=503, detail="Model not loaded")

    cache_params = {
        "max_new_tokens": request.max_new_tokens,
        "temperature": request.temperature,
        "top_p": request.top_p,
        "do_sample": request.do_sample
    }
    cache_key = get_cache_key(request.prompt, cache_params)

    cached = get_cached_response(cache_key)
    if cached:
        logger.info("Serving from cache")
        cached["processing_time"] = time.time() - start
        cached["cached"] = True
        return GenerationResponse(**cached)

    try:
        gen_args = {
            "max_new_tokens": request.max_new_tokens,
            "temperature": request.temperature,
            "top_p": request.top_p,
            "do_sample": request.do_sample,
            "pad_token_id": tokenizer.eos_token_id,
            "return_full_text": False
        }

        result = text_generator(request.prompt, **gen_args)[0]
        text = result["generated_text"]
        tokens = len(tokenizer.encode(text))

        response = {
            "prompt": request.prompt,
            "generated_text": text,
            "processing_time": time.time() - start,
            "device_used": DEVICE,
            "cached": False,
            "tokens_generated": tokens
        }

        background_tasks.add_task(cache_response, cache_key, response, 3600)
        logger.info(f"Generated {tokens} tokens in {response['processing_time']:.2f}s")
        return GenerationResponse(**response)

    except Exception as e:
        logger.error(f"Generation error: {e}")
        if "out of memory" in str(e).lower():
            raise HTTPException(status_code=507, detail="GPU memory insufficient")
        raise HTTPException(status_code=500, detail=f"Generation failed: {str(e)}")

if __name__ == "__main__":
    port = int(os.getenv("PORT", 8000))
    uvicorn.run(app, host="0.0.0.0", port=port)
Create requirements.txt:
fastapi==0.104.1
uvicorn[standard]==0.24.0
torch==2.1.0
transformers==4.35.2
accelerate==0.24.1
bitsandbytes==0.41.3
redis==5.0.1
python-multipart==0.0.6
pydantic==2.5.0
nvidia-ml-py3==7.352.0
scipy==1.10.1
Create Dockerfile:
FROM nvidia/cuda:11.8.0-devel-ubuntu20.04

# Prevent interactive prompts during installation
ENV DEBIAN_FRONTEND=noninteractive

# Set working directory
WORKDIR /app

# Install system dependencies
RUN apt-get update && apt-get install -y \
    python3 \
    python3-pip \
    python3-dev \
    curl \
    git \
    build-essential \
    && rm -rf /var/lib/apt/lists/*

# Create symbolic link for python
RUN ln -s /usr/bin/python3 /usr/bin/python

# Upgrade pip and build tools
RUN pip install --upgrade pip setuptools wheel

# Copy requirements first for better caching
COPY requirements.txt .

# Install Python dependencies
RUN pip install --no-cache-dir -r requirements.txt

# Copy application code
COPY . .

# Create cache directories
RUN mkdir -p /tmp/.transformers /tmp/.torch

# Set environment variables
ENV TRANSFORMERS_CACHE=/tmp/.transformers
ENV TORCH_HOME=/tmp/.torch
ENV CUDA_VISIBLE_DEVICES=0

# Expose port
EXPOSE 8000

# Health check with longer timeout for GPU models
HEALTHCHECK --interval=30s --timeout=60s --start-period=180s --retries=3 \
    CMD curl -f http://localhost:8000/health || exit 1

# Run the application
CMD ["python", "app.py"]Create convox.yml:
environment:
  - PORT=8000
  - MODEL_NAME=microsoft/DialoGPT-medium
  - MAX_MEMORY_GB=12
  - CUDA_VISIBLE_DEVICES=0
  - TRANSFORMERS_CACHE=/tmp/.transformers
  - TORCH_HOME=/tmp/.torch

resources:
  cache:
    type: redis
  # For production systems that need persistent model storage
  # Uncomment and configure these resources:
  # database:
  #   type: postgres  # For training data, user interactions, model metadata
  # storage:
  #   type: s3  # For model checkpoints, datasets, fine-tuned models

services:
  api:
    build: .
    port: 8000
    health:
      path: /health
      grace: 180  # GPU models need more time to load
      timeout: 60
      interval: 30
    resources:
      - cache
    nodeSelectorLabels:
      convox.io/label: gpu-inference   # Target GPU nodes for inference workloads
    scale:
      count: 1-5
      cpu: 3500    # 3.5 CPU cores
      memory: 14336 # 14GB RAM
      gpu: 1       # 1 GPU per instance
      targets:
        cpu: 70
        memory: 75
    termination:
      grace: 90
    timeout: 600  # Longer timeout for LLM inference
This configuration includes several key workload placement features:
gpu-inferenceNow that our GPU infrastructure is configured and our application is ready, we need to install the Convox CLI and deploy the application.
Linux (x86_64/amd64):
curl -L https://github.com/convox/convox/releases/latest/download/convox-linux -o /tmp/convox
sudo mv /tmp/convox /usr/local/bin/convox
sudo chmod 755 /usr/local/bin/convox
macOS (Intel):
curl -L https://github.com/convox/convox/releases/latest/download/convox-macos -o /tmp/convox
sudo mv /tmp/convox /usr/local/bin/convox
sudo chmod 755 /usr/local/bin/convox
macOS (M1/ARM64):
curl -L https://github.com/convox/convox/releases/latest/download/convox-macos-arm64 -o /tmp/convox
sudo mv /tmp/convox /usr/local/bin/convox
sudo chmod 755 /usr/local/bin/convoxconvox login console.convox.com -t YOUR_API_KEY_HEREconvox switch ai-production# Create the app
convox apps create llm-api
# Deploy the application
convox deployThe deployment process will build your GPU-enabled Docker image using the dedicated build node, push it to Convox's registry, deploy to GPU-enabled nodes with the specified scaling configuration, set up load balancing and health checks optimized for LLM workloads, and automatically scale GPU instances based on demand.
convox servicesYou'll see output like:
SERVICE  DOMAIN                                           PORTS
api api.llm-api.0a1b2c3d4e5f.convox.cloud 443:8000curl https://api.llm-api.0a1b2c3d4e5f.convox.cloud/health
# Test basic text generation
curl -X POST \
  -H "Content-Type: application/json" \
  -d '{
    "prompt": "The future of artificial intelligence is",
    "max_new_tokens": 50,
    "temperature": 0.7
  }' \
  https://api.llm-api.0a1b2c3d4e5f.convox.cloud/generate
You should get a response like:
{
  "prompt": "The future of artificial intelligence is",
  "generated_text": "bright and full of possibilities. As we continue to advance machine learning...",
  "processing_time": 1.234,
  "device_used": "cuda",
  "cached": false,
  "tokens_generated": 45
}# Test with higher creativity
curl -X POST \
-H "Content-Type: application/json" \
-d '{
"prompt": "Write a short story about a robot:",
"max_new_tokens": 100,
"temperature": 1.2,
"top_p": 0.95
}' \
https://api.llm-api.0a1b2c3d4e5f.convox.cloud/generateconvox logsconvox psYou'll see your running processes. As inference load increases, Convox will automatically start additional GPU instances on the dedicated GPU node groups.
convox apps info# Check that your workloads are running on the correct nodes
convox rack kubeconfig > ~/.kube/convox-config
export KUBECONFIG=~/.kube/convox-config
# View which nodes your pods are running on
kubectl get pods -n ai-production-llm-api -o widecurl https://api.llm-api.0a1b2c3d4e5f.convox.cloud/metrics# Scale to a specific count
convox scale api --count=3
# Or update scaling parameters in convox.yml and redeploy
convox deployFor more powerful models, you can create additional GPU node groups and target them specifically:
Create large-gpu-nodes.json:
[
  {
    "id": 103,
    "type": "p3.2xlarge",
    "capacity_type": "ON_DEMAND",
    "min_size": 0,
    "max_size": 2,
    "label": "gpu-inference-v100",
    "dedicated": true,
    "tags": "workload=llm-large-inference,gpu=v100,environment=production"
  }
]
Update your rack configuration:
convox rack params set additional_node_groups_config=/path/to/combined-gpu-nodes.json -r ai-productionThen update your convox.yml for larger models:
services:
  api-large:
    build: .
    port: 8000
    environment:
      - MODEL_NAME=microsoft/DialoGPT-large
      - MAX_MEMORY_GB=24
    scale:
      count: 1-2  # Fewer instances for larger models
      cpu: 8000   # More CPU for larger models
      memory: 32768 # 32GB RAM
      gpu: 1
    # Target V100 GPU nodes for large models
    nodeSelectorLabels:
convox.io/label: gpu-inference-v100For models requiring multiple GPUs:
services:
  api-multi-gpu:
    build: .
    scale:
      gpu: 2  # Request 2 GPUs per instance
      count: 1-2  # Fewer instances due to resource requirements
      cpu: 8000
      memory: 32768
    nodeSelectorLabels:
convox.io/label: gpu-inference-v100The workload placement strategy we've configured provides several cost benefits:
Monitor your costs using the AWS tags we configured:
# View cost allocation by workload
aws ce get-cost-and-usage \
  --time-period Start=2024-01-01,End=2024-01-31 \
  --group-by Type=DIMENSION,Key=SERVICE \
  --granularity MONTHLY \
  --metrics BlendedCost \
--group-by Type=TAG,Key=workloadCurrent Setup: This guide focuses on inference-only deployment. The model is read-only and Redis only caches responses for performance.
For Production AI Systems That Learn Over Time:
1. Add Persistent Database Storage:
resources:
  database:
    type: postgres
    options:
      storage: 100
  cache:
    type: redis
2. Add Model Storage:
# Add to convox.yml
environment:
  - MODEL_STORAGE_PATH=s3://your-bucket/models/
  - TRAINING_DATA_PATH=s3://your-bucket/training-data/
3. Enable Volume Mounting for Model Persistence:
services:
  api:
    volumeOptions:
      - awsEfs:
          id: "model-storage"
          accessMode: ReadWriteMany
          mountPath: "/app/models"
    # Still target GPU nodes
    nodeSelectorLabels:
convox.io/label: gpu-inferenceUse different model configurations for different environments:
# Production - use larger, more capable model on V100 nodes
convox env set MODEL_NAME=microsoft/DialoGPT-large -r ai-production

# Staging - use smaller model on standard GPU nodes
convox env set MODEL_NAME=microsoft/DialoGPT-medium -r ai-stagingSet up monitoring through the Convox Console:
You can modify the app to support custom models while maintaining proper GPU node targeting:
# Add to app.py
CUSTOM_MODEL_PATH = os.getenv('CUSTOM_MODEL_PATH')
if CUSTOM_MODEL_PATH:
    MODEL_NAME = CUSTOM_MODEL_PATH
logger.info(f"Loading custom model from {CUSTOM_MODEL_PATH}")For handling multiple requests efficiently:
@app.post("/generate_batch")
async def generate_batch(requests: List[GenerationRequest]):
    """Handle multiple generation requests in a single batch"""
    # Implementation for batched inference
passFor memory-constrained deployments:
# Add different quantization options
quantization_config = BitsAndBytesConfig(
    load_in_4bit=True,  # Even more memory efficient
    bnb_4bit_compute_dtype=torch.float16,
    bnb_4bit_use_double_quant=True,
)GPU Not Available:
# Check if NVIDIA plugin is enabled
convox rack params
# Should show nvidia_device_plugin_enable=true
Workloads Not Targeting GPU Nodes:
# Verify node labels exist
kubectl get nodes --show-labels | grep gpu-inference

# Check pod placement
kubectl get pods -n ai-production-llm-api -o wide
Out of Memory Errors:
max_new_tokens in requestsSlow Model Loading:
Cold Start Issues:
# Keep minimum instances running
convox scale api --count=2  # Always keep 2 instances warm
Cache Hit Rate:
# Monitor cache performance
curl https://api.llm-api.0a1b2c3d4e5f.convox.cloud/metrics
Node Group Scaling:
# Monitor node group scaling
kubectl get nodes -l convox.io/label=gpu-inferenceYou now have a production-ready GPU-accelerated LLM API that:
This foundation can serve as the basis for more advanced AI systems. You can extend it by supporting multiple model architectures, implementing streaming responses for real-time chat, adding fine-tuning capabilities, integrating with vector databases for RAG applications, supporting multi-modal inputs (text + images), and creating specialized node groups for different model types.
Core Enhancements:
Infrastructure Optimization:
Advanced AI Features:
For Advanced AI Platforms:
Want to deploy more advanced AI workloads? Explore our complete collection of deployment guides
Ready to deploy your own GPU-accelerated AI applications with optimized workload placement?
Get started free with Convox and have your first LLM API running in production within minutes, while keeping costs under control with intelligent GPU node management.
Need help migrating existing AI workloads or want a custom demo for your team? Contact our sales team for personalized guidance and enterprise deployment strategies.