
Here is a story that plays out at startups every quarter. The AWS bill spikes to a number that makes the founders wince. Someone on the engineering team gets voluntold to fix it. They read a few articles, learn that Reserved Instances offer up to 40% off on-demand pricing, and buy $2,000 per month worth of one-year commitments. Six months later, the bill has dropped by $180. Not $800. Not even $400. One hundred and eighty dollars.
The team did not do anything wrong, exactly. They did the steps out of order. Reserved Instances are a pricing tool, not an efficiency tool. An RI locks in a discount on a specific instance type and size, which means it also locks in whatever waste was already running on that instance. If the workload sitting on that m5.xlarge is only using 30% of its capacity, you just signed a twelve-month contract to pay for the other 70% at a discount. Discounted waste is still waste.
This post is a practical, four-step cost audit you can run this week if your reserved instances aren't saving money the way the calculator promised. It is written for teams running on Convox Racks in their own AWS account, using tooling that is already built into the platform: per-service cost tracking, a cost CLI with forecasted month-end totals, explicit resource reservations in convox.yml, and budget caps that keep an optimized baseline from drifting back to where it started. No FinOps consultants, no cost allocation tag spreadsheets, no becoming an AWS billing expert on nights and weekends.

The core mechanic of a Reserved Instance is simple: you promise AWS you will pay for a certain amount of compute for one or three years, and in exchange you get a lower hourly rate. The RI itself does nothing to your infrastructure. It does not resize anything, consolidate anything, or shut anything down. It is a billing construct that applies a discount to matching usage.
That last phrase, matching usage, is where most of the disappointment comes from. Three failure modes show up over and over on lean teams:
The fix for all three is the same, and it is boring: right-size first, commit second, then monitor continuously so the sizing stays right. The problem has never been that teams do not know this. The problem is that without per-service visibility, right-sizing means exporting Cost Explorer CSVs into a spreadsheet and guessing which line items map to which services. Nobody has time for that, so it does not happen. The audit below replaces the spreadsheet with commands you can run against your Rack directly.
You cannot right-size what you cannot see. The AWS bill tells you what you spent on EC2 in aggregate. It does not tell you that your worker service is burning 60% of the compute budget while doing a job that runs for four hours a day. AWS cost optimization starts with attribution: which service, on which instance type, is costing what.
On Convox Racks running version 3.24.6 or later on AWS, this is a single rack parameter. Enable cost tracking:
$ convox rack params set cost_tracking_enable=trueThe apply takes about three minutes, and the first accumulator tick lands roughly ten minutes after that. From then on, the Rack samples every running pod's CPU, memory, and GPU allocation, prices each sample against the instance type it is actually running on, and attributes the spend to the service that owns the pod. Then you get a per-service cost breakdown with one command:
$ convox cost --app myapp
SERVICE        INSTANCE     CAPACITY   ACTIVE-REPLICAS  SPEND-USD
worker         m5.xlarge    on-demand  4                $412.80
web            m5.xlarge    on-demand  3                $309.60
api            m5.xlarge    on-demand  2                $206.40
_build         c5.large     on-demand  ($18.20)
_unattributed  m5.xlarge    on-demand  ($9.40)
TOTAL: $956.40
Two rows in that output deserve attention because they are exactly the kind of spend that hides in a raw AWS bill. The _build bucket is the cost of your build pods, tracked separately so it does not inflate the apparent runtime cost of the service being built. The _unattributed bucket catches pods with no service label: system sidecars, autoscaler components, anything that is not user-deployed. In a spreadsheet-based audit these costs get smeared across everything else or ignored entirely. Here they are line items you can see and reason about. The cost CLI also supports --aggregate for app-level totals with a forecast-friendly as-of timestamp, and --format json if you want to feed the data into your own dashboards.
Run this against every app on your Rack and write down two things per service: the current monthly spend and the instance type it runs on. Then pull up your existing monitoring (the Convox Console includes built-in metrics dashboards with rack CPU and memory usage panels) and note the actual utilization of those services. In our experience, this fifteen-minute exercise is where the audit gets uncomfortable. Most teams discover that their biggest line item is running at 25 to 40% utilization, which means their RI purchase discounted a resource they were mostly not using.
With visibility in hand, the next move is to make each service reserve what it actually needs rather than what someone guessed during initial setup. On Convox, resource reservations are declared per service in convox.yml using the scale block, with CPU expressed in millicores (1000 units equals one full vCPU) and memory in megabytes.
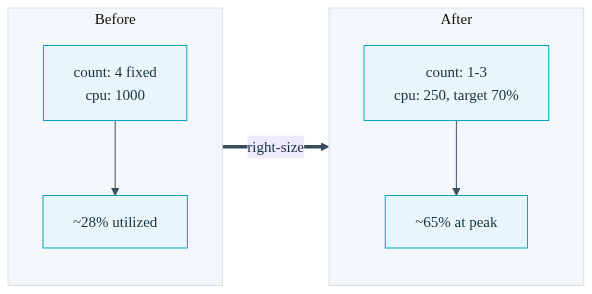
Here is what a typical before-and-after looks like. Before: a web service that was set up with round numbers and a fixed replica count because that was the safe guess on launch day.
services:
  web:
    build: .
    port: 3000
    scale:
      count: 4
      cpu: 1000
      memory: 2048
After: reservations sized against observed usage, and a replica range instead of a fixed count so the service scales with load rather than sitting at peak capacity around the clock.
services:
  web:
    build: .
    port: 3000
    scale:
      count: 1-3
      cpu: 250
      memory: 512
      targets:
        cpu: 70
The count: 1-3 range paired with a CPU target tells the Rack to run one replica at quiet times and scale to three when average CPU utilization crosses 70%. The reservation changes matter just as much: dropping the CPU request from 1000 to 250 millicores means four times as many replicas fit on the same node, which directly determines how many nodes your cluster needs and therefore what your bill looks like. See the scaling documentation for the full set of options, including memory targets and event-driven triggers.
A few practical notes for this step. Size reservations against your observed peak plus a reasonable margin, not your observed average, because the reservation is what Kubernetes uses to place the pod and what a too-low memory value gets your process killed for exceeding. Batch and worker services are usually the biggest wins here: they often carry web-sized reservations while running bursty workloads that would be better served by a wider autoscaling range or, for scheduled work, a timer pointed at a service scaled to zero.
One important detail: a static count in convox.yml only applies on the first deploy. After that, replica counts are managed by convox scale or by the autoscaler if you configured a range. So if a service was manually scaled up during an incident eight months ago and never scaled back down, this is the step where you find it. Deploy the changes, then rerun convox cost --app myapp a day later and watch the per-service numbers move.
Right-sized pods on wrong-sized nodes still waste money. If your services collectively need six vCPUs but your fleet is three m5.2xlarge instances providing twenty-four, you are paying for eighteen vCPUs of headroom no matter how tidy your convox.yml is. This is the layer where AWS right-sizing usually stalls for lean teams, because changing instance types on a hand-managed cluster feels risky. On a Convox Rack it is a parameter change:
$ convox rack params set node_type=m5.largeThe Rack applies the change as an infrastructure update and rolls nodes without taking your applications down. As with any infrastructure change, test it on a staging Rack first and run it during a low-traffic window. The full list of node-related parameters, including node_capacity_type for spot and mixed fleets, is in the CLI rack management docs.
For teams whose load varies meaningfully across the day or week, static node sizing of any kind leaves money on the table. This is where Karpenter comes in. With Karpenter enabled, node provisioning follows workload demand: when your autoscaled services need more capacity, appropriately sized nodes are provisioned; when demand drops, excess nodes are removed. Instead of you predicting the fleet, the fleet follows the pods.
$ convox rack params set karpenter_enabled=trueThere is a compounding benefit here that circles back to the RI question. Convox's cost tracking attributes spend per instance type and capacity type, and spot capacity provisioned through Karpenter is automatically priced with a spot discount in your convox cost output. That means when you eventually make commitment decisions, you are making them against a fleet whose shape reflects real demand, with the spot-eligible portion already carved out. You commit to the stable floor, not the whole noisy ceiling.
After steps one through three, your baseline looks completely different. Services reserve what they use, replicas track load, and nodes track replicas. What remains is a stable, well-understood floor of compute demand, and that floor is exactly what Reserved Instances and Savings Plans are designed for. Committing to a right-sized baseline is how you get real RI ROI; committing to an oversized one is how you got here.
Two Convox features make the commitment phase manageable instead of a leap of faith. The first is the pricing adjustment on budget caps. Convox prices spend from a built-in list-price table, but your finance team sees the RI-discounted invoice. The --pricing-adjustment flag applies a multiplier at sample time so the numbers in convox cost line up with your actual contract pricing. If your effective committed-use discount is 30%, model it directly:
$ convox budget set myapp --pricing-adjustment 0.7The second is the cap itself. Baseline drift, the third failure mode from the top of this post, is what erodes RI coverage over time: new services, crept-up replica counts, forgotten experiments. A monthly cap with an alert-only action gives you a tripwire without any enforcement risk. If the app you just optimized down to $600 a month starts trending toward $900, you find out from a notification, not from next month's invoice:
$ convox budget set myapp --monthly-cap 750 --alert-at 80 --at-cap-action alert-onlyThe threshold alert fires at 80% of the cap and the at-cap event fires if spend crosses it, both routable to Slack or Discord through notification integrations. For non-production apps you can go further with block-new-deploys or auto-shutdown actions, but for the production baseline you are protecting an RI commitment against, alert-only is the right starting point. Note that budget enforcement requires cost tracking to be enabled, which you did in step one.
Here is the audit applied to a plausible mid-sized app: a web tier, an API, and a worker fleet, all running on m5.xlarge nodes at fixed replica counts, sitting under a $2,000 per month one-year RI purchase that produced almost no visible savings.
| Metric | Before Audit | After Audit |
|---|---|---|
| web service | 4 fixed replicas, cpu: 1000, ~28% utilized |
count: 1-3, cpu: 250, ~65% utilized at peak |
| worker service | 4 fixed replicas running 24/7 | count: 1-4 autoscaled with load |
| Node fleet | 6x m5.xlarge, static |
2-4x m5.large, Karpenter-managed |
| Cost visibility | Monthly AWS invoice, aggregate only | Per-service breakdown via convox cost, alert at 80% of cap |
| Monthly compute spend | ~$2,050 (RIs saved ~$180) | ~$780 before commitments, ~$620 after |
The sequencing is the whole point of that table. Right-sizing services and nodes took the true baseline from roughly $2,050 to roughly $780, a saving of over 60% with zero commitment and zero risk. Only then does a commitment on the remaining stable floor make sense, and a 30% discount on $550 of steady-state usage (keeping the spiky top slice on demand or spot) brings the total to around $620. Compare that to the original approach: committing at the top of the waste curve produced $180 of savings and a year of lock-in on instance types the team no longer even wants to run.

The uncomfortable truth about AWS cost optimization is that it is not a project, it is a property of your platform. A one-time audit produces a one-time saving that erodes as the system evolves. What made the original RI purchase fail was not the purchase itself but the absence of any feedback loop around it: nobody could see per-service spend, so nobody noticed the waste before committing to it, and nobody noticed the drift afterward.
This is where running on a platform changes the economics for lean teams. On a Convox Rack, the feedback loop is built in. Cost attribution runs continuously and resets cleanly each month. Resource reservations live in convox.yml next to the code, so every pull request that changes a service can change its footprint deliberately. Autoscaling ranges and Karpenter keep replicas and nodes tracking demand without anyone babysitting a dashboard. Budget caps turn drift into a notification instead of a surprise invoice. And because the Rack runs in your own AWS account, every optimization lands directly on your bill, and every AWS-native cost lever, including Reserved Instances and Savings Plans, remains fully available to you.
That is the difference between a quarterly spreadsheet exercise and a system that stays right-sized by default. RIs are a fine tool. They just need to be the last step of the process, not the first.
Ready to see where your AWS spend is actually going? If you are on a Convox Rack (version 3.24.6 or later on AWS), enable cost tracking today with convox rack params set cost_tracking_enable=true and run convox cost --app <app> within the hour. The cost tracking guide and budget caps documentation cover everything in this audit in more depth.
Not on Convox yet? Create a free account and install a Rack in your own AWS account, with the developer experience of a PaaS and every cost lever of AWS still in your hands. Questions about running Convox at scale? Reach out to our team.


